DIY:12U Rack: Difference between revisions
| Line 154: | Line 154: | ||
== {{icon|camera-lens}} Build Pictures == | == {{icon|camera-lens}} Build Pictures == | ||
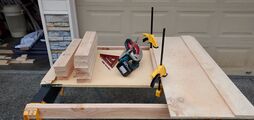
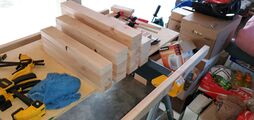
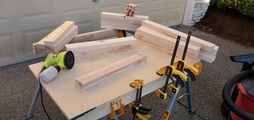
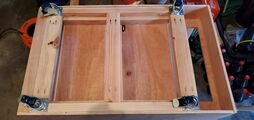
I attempted to document the process as best as I could. The frame was made from the 2x4s once they were transformed into 1.5x3s, the bottom mini-frame is supported by oak 2x1s that I cut from a piece of oak (1x5) in my scrap bin. I then wrapped the frame in 1/2" sanded plywood, using hardwood dowels to secure the rear frame (making it removable). | I attempted to document the process as best as I could. The frame was made from the 2x4s once they were transformed into 1.5x3s, the bottom mini-frame is supported by oak 2x1s that I cut from a piece of oak (1x5) in my scrap bin. I then wrapped the frame in 1/2" sanded plywood, using hardwood dowels to secure the rear frame (making it removable). | ||
<gallery caption="12U Rack Cabinet Build Pictures" widths=256px perrow=2 style="margin:0 auto;"> | |||
File:20201219_115036.jpg|01. Began by cutting all the frame pieces down to size. | |||
File:20201222_133216.jpg|02. With the frame pieces all cut to size it's time for sanding. | |||
File:20201223_141738.jpg|03. All pieces were sanded with 80, 120 and then 220 grit. | |||
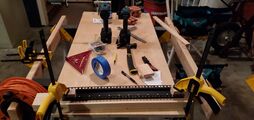
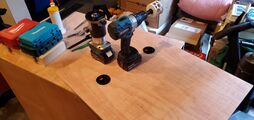
File:20201225_003231.jpg|04. Pocket holes are then drilled in all required pieces. | |||
File:20201225_003500.jpg|05. All of the frame pieces receive three coats of lacquer. | |||
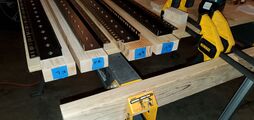
File:20201226_160521.jpg|06. The rack rails were then attached to the four posts. | |||
File:20201226_161847.jpg|07. All posts were subsequently labeled. | |||
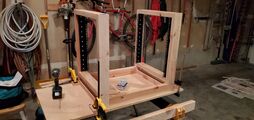
File:20201226_163851.jpg|08. Frame assembly began, starting with the rear. | |||
File:20201226_172535.jpg|09. The front and rear were then connected to form the full frame. | |||
File:20201226_223510.jpg|10. Horizontal beams were added to support the weight of the battery backup units. | |||
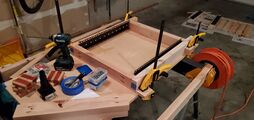
File:20201228_144910.jpg|11. With the frame finished, all the plywood was then cut to size for the cabinet paneling. | |||
File:20201228_170003.jpg|12. Once the plywood was cut, they were sanded and given the lacquer treatment. | |||
File:20201229_142542.jpg|13. Cabinet assembly was pretty straight forward, I took a deviation from the plans here and decided to nail most of the panels together. | |||
File:20210101_124517.jpg|14. Using a hole saw, I cut two ports on the back compartment for wire grommets. | |||
File:20210101_124535.jpg|15. Using a combination jigsaw and then router I cutout a slot for a 2U vented blank that will function as an air intake. | |||
File:20210102_222313.jpg|16. Four hardwood dowels and four oak stop-blocks allow the back panel to be removable. | |||
File:20210103_111505.jpg|17. Test fit of the back panel looks good. | |||
File:20210104_135119.jpg|18. Casters were installed with lag screws. | |||
File:20210105_150254.jpg|19. After a day or two in the garage to let the glue/finish settle I lugged it inside. | |||
File:20210108_154058.jpg|20. Despite the front door not being finished I decided to swap the old rack for the new one, installing everything with Rackstuds. | |||
</gallery> | |||
[[Category:DIY]] | [[Category:DIY]] | ||
Revision as of 19:57, 18 January 2021
 Introduction
In May of 2018 I built a 14U wooden rack frame, while working fine it was a very rudimentary build with no flair, heck not even rails (equipment was fastened directly to the wood).
In the beginning of 2020 as nothing more than wishful thinking, I began designing a rack cabinet in SketchUp. Beginning as a 24U cabinet (2 revisions), shifting to a 20U cabinet (3 revisions), then 12U cabinet (3 revisions), then dual 12U desk (2 revisions) and finally settling back on 12U rack cabinet (4 more revisions). Based on the EIA/ECA-310-E specification, I started with the Z-Series rails from Star Case and included all the features I wanted in a cabinet.
 Plans
Plans
 Parts List
 Glass
Glass
- LEXAN 11" x 14" x 0.093" Clear Polycarbonate Sheet-GE-34
 GE-34
GE-34 8.98 — Home Depot (Purchased: 2021/01/04)
 Lumber
- 1" x 4" x 39" Common Board Bed Slat 1001749849 2.39 — Home Depot (Purchased: 2020/12/31) |
 3
3
- 2" x 4" x 92-5/8" Prime Whitewood Stud 569062 4.98 — Home Depot (Purchased: 2020/12/14) | 6
- Endesa Sandeply Plywood 1/2" x 4' x 8' (12mm) 454532 35.95 — Home Depot (Purchased: 2020/12/28)
- Kelleher 3/8" x 48" Round Dowel IM6406U-40 0.98 — Home Depot (Purchased: 2021/01/01)
 Hardware
- Everbilt 5/16" x 2" Stainless Steel Hex Lag Screw, 5 pc. 812680 7.56 — Home Depot (Purchased: 2020/12/31) | 2
- Everbilt Surface Mount Soft Close Hinge, 2 pc. 9289518 11.48 — Home Depot (Purchased: 2021/01/04)
- Kreg 2-1/2" Coarse Zinc-Plated Steel Square-Head Pocket Screw, 50 pc. SML-C250-50 5.97 — Home Depot (Purchased: 2020/11/09) | 2
- SPAX 5/16" x 3" POWERLAG Hex Drive Washer Head Lag Screw 4571820800757 0.87 — Home Depot (Purchased: 2020/12/31) | 4
- Teks #8 x 1" Philips Truss-Head Lath Screw, Zinc-Plated, 170 pc. 21508 7.57 — Home Depot (Purchased: 2020/12/26)
- TITAN Industrial 2" Polyurethane Swivel Caster w/ Brake 4126599LN 6.98 — Lowe's (Purchased: 2020/12/31) | 4
 Rack Hardware & Accessories
- 2U Blank Rack Mount Spacer, Slotted Venting 00406023 17.95 — Navepoint (Purchased: 2020/12/31)
- Rackstuds Series II, Purple, 3.2mm, 20 pc. B07W7BWRX3 17.00 — Amazon (Purchased: 2020/12/26) | 2
 Spray Finish
- Deft Aerosol Interior Clear Wood Finish Brushing Lacquer, Satin 01713 5.98 — Home Depot (Purchased: 2020/12/22) | 2
 Build Pictures
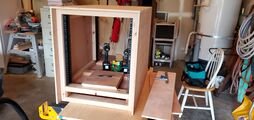
I attempted to document the process as best as I could. The frame was made from the 2x4s once they were transformed into 1.5x3s, the bottom mini-frame is supported by oak 2x1s that I cut from a piece of oak (1x5) in my scrap bin. I then wrapped the frame in 1/2" sanded plywood, using hardwood dowels to secure the rear frame (making it removable).
- 12U Rack Cabinet Build Pictures
01. Began by cutting all the frame pieces down to size.
02. With the frame pieces all cut to size it's time for sanding.
03. All pieces were sanded with 80, 120 and then 220 grit.
04. Pocket holes are then drilled in all required pieces.

05. All of the frame pieces receive three coats of lacquer.
06. The rack rails were then attached to the four posts.
07. All posts were subsequently labeled.
08. Frame assembly began, starting with the rear.
09. The front and rear were then connected to form the full frame.
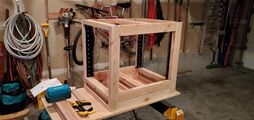
10. Horizontal beams were added to support the weight of the battery backup units.
11. With the frame finished, all the plywood was then cut to size for the cabinet paneling.
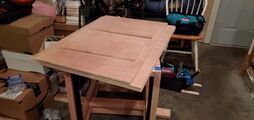
12. Once the plywood was cut, they were sanded and given the lacquer treatment.
13. Cabinet assembly was pretty straight forward, I took a deviation from the plans here and decided to nail most of the panels together.
14. Using a hole saw, I cut two ports on the back compartment for wire grommets.
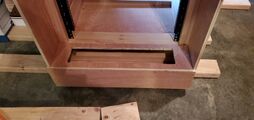
15. Using a combination jigsaw and then router I cutout a slot for a 2U vented blank that will function as an air intake.
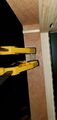
16. Four hardwood dowels and four oak stop-blocks allow the back panel to be removable.
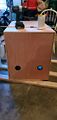
17. Test fit of the back panel looks good.
18. Casters were installed with lag screws.
19. After a day or two in the garage to let the glue/finish settle I lugged it inside.
20. Despite the front door not being finished I decided to swap the old rack for the new one, installing everything with Rackstuds.


